Garlic Crochet Pattern: 4 Cute Amigurumi Sprout Friends

Turn one playful garlic-bulb base into four completely different amigurumi characters. This 4-in-1 garlic crochet pattern includes Lavender Bud, Sunny Chick, Cozy Lamb and Little Penguin – four small sprout friends built around a shared head shape, with character-specific bodies, faces and finishing details.
Instead of making you repeat the same long instructions four times, the pattern starts with the shared garlic head and then branches into the pieces you need for each character. That makes it easier to follow, easier to check, and much more practical if you decide to crochet the whole set.
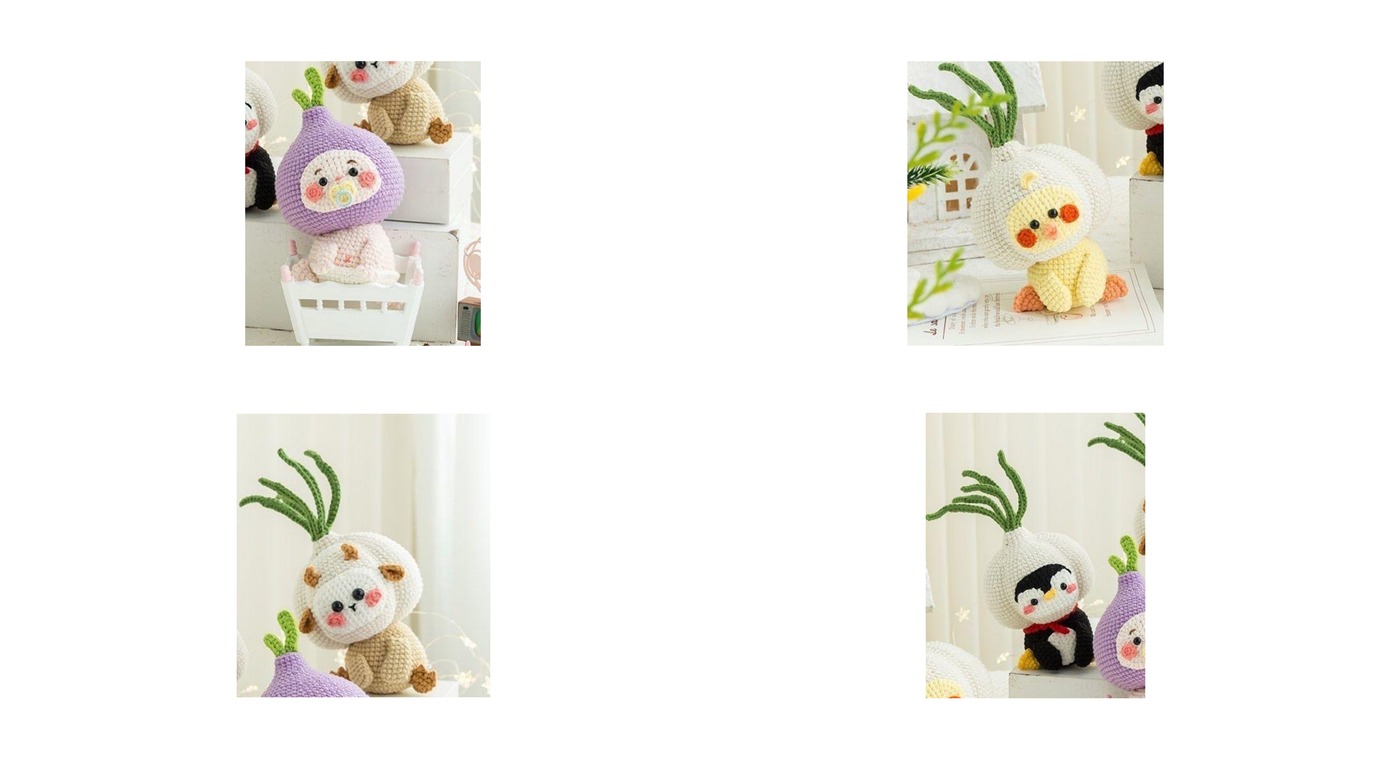
Lavender Bud, Sunny Chick, Cozy Lamb and Little Penguin.
PRINTABLE PDF
Prefer a clean printable version? The 4-in-1 PDF edition is also available from Crochet Favorites.
Project at a Glance
| Skill level | Intermediate |
| Finished size | Approx. 12 cm / 4.7 in tall |
| Hook | 2.0 mm |
| Terminology | US crochet terms |
Why This 4-in-1 Pattern Is Easier to Follow
All four dolls use the same garlic-bulb head. Sunny Chick, Cozy Lamb and Little Penguin also share the same standard body, while Lavender Bud uses a custom body with different openings and shaping.
The most important habit is simple: check the stitch count at the end of every round before moving on. The pattern tables include a stitch-count column so errors are easier to catch while they are still small.
Materials and Tools
4-ply combed cotton / sport-weight yarn in the colors needed for your chosen character
2.0 mm crochet hook
Polyester fiberfill
Yarn or tapestry needle
Stitch marker
Pins and scissors
Thin flexible craft wire for the garlic sprout leaves (optional)
Small black safety eyes or embroidered eyes
Fabric glue for tiny details (optional)
WIRE SAFETY
Bend every wire end inward and keep it fully enclosed inside the crocheted leaf. For a toy intended for a small child, omit the wire and shape the leaves with yarn alone.
Crochet Abbreviations
| MR | magic ring | hdc | half double crochet |
| ch | chain | hdc inc | 2 hdc in same stitch |
| sc | single crochet | FLO | front loop only |
| inc | 2 sc in same stitch | BLO | back loop only |
| inv dec | invisible sc decrease | sk | skip |
| std dec | regular sc decrease | [ … ] | work bracketed stitches into the same stitch |
| sl st | slip stitch | ||
Meet the Four Garlic Sprout Friends
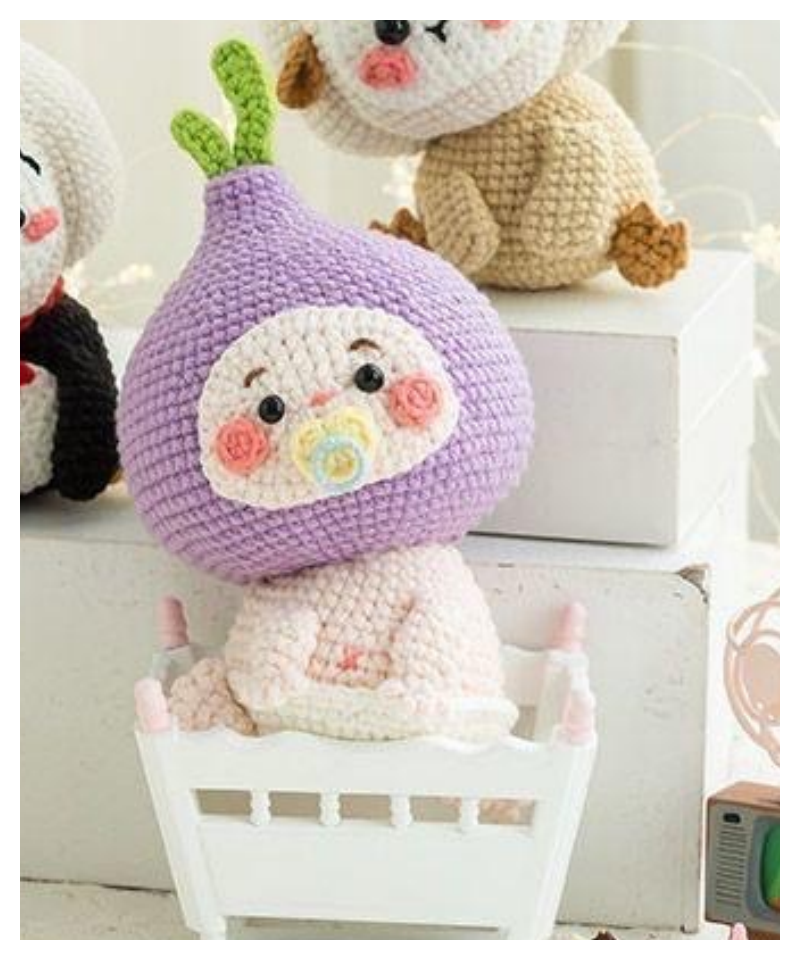 Lavender Bud A baby-inspired purple sprout with a pacifier-style face detail and a custom body. | 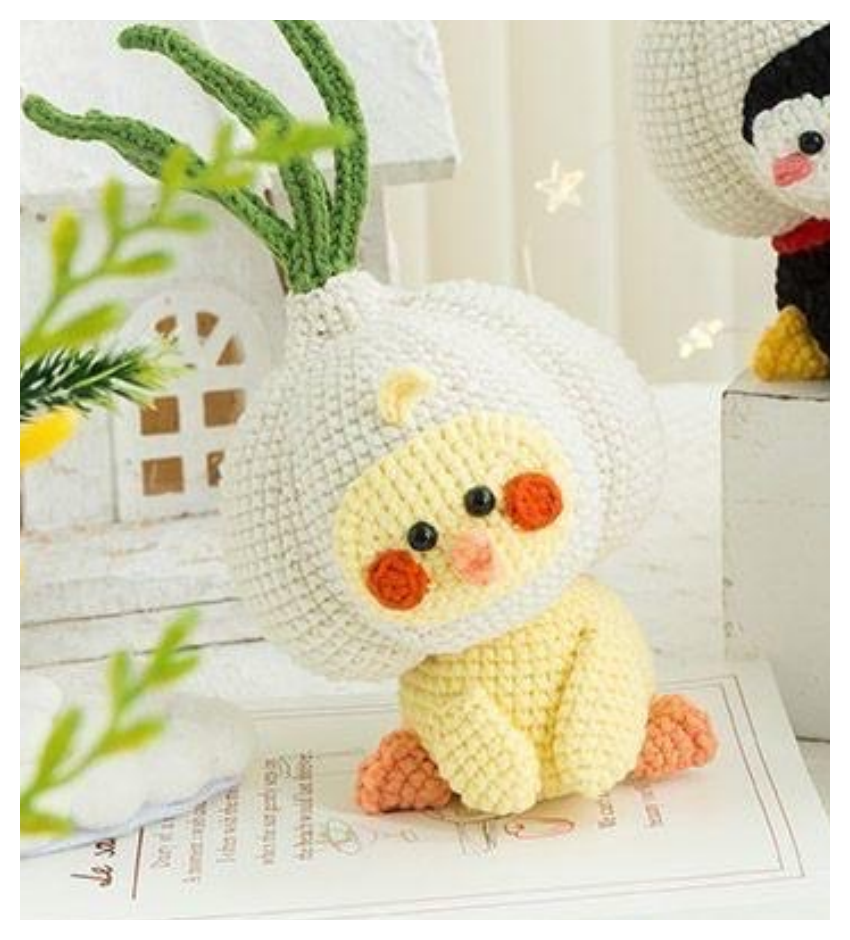 Sunny Chick A cheerful yellow chick variation with a beak, top feather, wings and wired garlic leaves. |
 Cozy Lamb A soft lamb-inspired version with ears, tiny horns, front legs and a seated pose. |  Little Penguin A classic black-and-white variation with a two-color face panel, belly patch and scarf. |
Before You Start
Read the full section for your chosen character before crocheting its small finishing pieces.
Use a stitch marker even when working joined rounds; it makes the first stitch easy to find when checking the shape.
Pin face panels, limbs and leaves before sewing. A few millimeters of placement can change the expression and balance of a small amigurumi.
Stuff gradually rather than all at once. The garlic head needs enough flexibility for the final bulb indentations.
Full Garlic Sprout Friends Crochet Pattern
The written pattern below follows the same make order as the printable PDF: shared base first, then the character-specific pieces and assembly.
SHARED BASE / ALL FOUR CHARACTERS
Head – build the bulb shape
Use this head for Lavender Bud, Sunny Chick, Cozy Lamb and Little Penguin. Work in joined rounds from a magic ring. Keep the fabric compact.
PHASE 1 Rounds 1-11 expand the bulb. Rounds 12-18 hold the full 80-stitch circumference. Count carefully before you start decreasing.
| Rnd / Row | Stitch sequence | Sts |
| R1 | MR, 5 sc | 5 |
| R2 | 5 inc | 10 |
| R3 | 10 inc | 20 |
| R4 | (sc, inc) x 10 | 30 |
| R5 | (sc, inc, sc) x 10 | 40 |
| R6 | 40 sc | 40 |
| R7 | (3 sc, inc) x 10 | 50 |
| R8 | (2 sc, inc, 2 sc) x 10 | 60 |
| R9 | (5 sc, inc) x 10 | 70 |
| R10 | 70 sc | 70 |
| R11 | (3 sc, inc, 3 sc) x 10 | 80 |
Straight section
| Rnd / Row | Stitch sequence | Sts |
| R12-R18 | 80 sc | 80 |
MAKER TIP
Place a stitch marker at the first stitch even though these are joined rounds. It gives you a quick visual reference when checking the shape.
SHARED BASE / ALL FOUR CHARACTERS
Head – shape, stuff and close
From Round 19 the bulb narrows gradually. Begin stuffing around Round 30 and continue little by little so the filling stays even.
PHASE 2 Do not overstuff before the final decreases. You need enough flexibility to create the garlic-bulb indentations after closing.
| Rnd / Row | Stitch sequence | Sts |
| R19 | (7 sc, inv dec, 7 sc) x 5 | 75 |
| R20 | 75 sc | 75 |
| R21 | (13 sc, inv dec) x 5 | 70 |
| R22 | 70 sc | 70 |
| R23 | (6 sc, inv dec, 6 sc) x 5 | 65 |
| R24 | 65 sc | 65 |
| R25 | (11 sc, inv dec) x 5 | 60 |
| R26 | (5 sc, inv dec, 5 sc) x 5 | 55 |
| R27 | (9 sc, inv dec) x 5 | 50 |
| R28 | (4 sc, inv dec, 4 sc) x 5 | 45 |
| R29 | (7 sc, inv dec) x 5 | 40 |
| R30 | (3 sc, inv dec, 3 sc) x 5 | 35 |
| R31 | (5 sc, inv dec) x 5 | 30 |
| R32 | (2 sc, inv dec, 2 sc) x 5 | 25 |
| R33 | (3 sc, inv dec) x 5 | 20 |
| R34 | 20 sc | 20 |
| R35 | (sc, inv dec, sc) x 5 | 15 |
| R36-R37 | 15 sc | 15 |
| R38 | BLO: (sc, inv dec) x 5 | 10 |
Finish the bulb
Finish stuffing firmly and close the remaining opening with the reserved yarn tail.
With matching yarn, make shallow vertical indentations from the top toward the base.
Tighten gently and evenly so the head looks lobed rather than pinched.
SHARED BASE / SUNNY CHICK • COZY LAMB • LITTLE PENGUIN
Standard Body
Sunny Chick, Cozy Lamb and Little Penguin use the same body. Lavender Bud has a separate body because its openings and shaping differ.
| Rnd / Row | Stitch sequence | Sts |
| R1 | MR, 8 sc | 8 |
| R2 | 8 inc | 16 |
| R3 | (sc, inc) x 8 | 24 |
| R4 | (sc, inc, sc) x 8 | 32 |
| R5 | (3 sc, inc) x 8 | 40 |
| R6 | (2 sc, inc, 2 sc) x 8 | 48 |
| R7-R9 | 48 sc | 48 |
| R10 | (10 sc, inv dec) x 4 | 44 |
| R11-R12 | 44 sc | 44 |
| R13 | (9 sc, inv dec) x 4 | 40 |
| R14 | 40 sc | 40 |
| R15 | 9 sc, inv dec, 18 sc, ch 1, sk 2, 9 sc | 37 |
| R16 | 9 sc, inv dec, 14 sc, ch 5, sk 6, 6 sc | 30 |
| R17 | 8 sc, inv dec, 11 sc, ch 7, sk 6, 3 sc | 23 |
| R18 | 8 sc, inv dec, 7 sc, ch 7, sk 6 | 16 |
| R19 | 3 sl st, 4 sc, inv dec, 4 sc, ch 5, sk 3; sl st to first sc to finish | – |
BEFORE YOU SEW
Stuff the body evenly, leave the long sewing tail, and pin it under the head before committing to the seam. Check that the doll sits upright.
Lavender Bud
Baby-inspired garlic sprout
Custom Body
Lavender Bud is the only character with this body. The chain-and-skip sections create the shaped openings shown in the finished doll.
| Rnd / Row | Stitch sequence | Sts |
| R1 | MR, 8 sc | 8 |
| R2 | 8 inc | 16 |
| R3 | (sc, inc) x 8 | 24 |
| R4 | (sc, inc, sc) x 8 | 32 |
| R5 | (3 sc, inc) x 8 | 40 |
| R6 | (2 sc, inc, 2 sc) x 8 | 48 |
| R7 | 48 sc | 48 |
| R8 | FLO: 8 sc, (hdc, hdc inc) x 4, 8 sc, ch 16, sk 24 | – |
| R9 | 2 sl st, 2 sc, inv dec, 18 sc, inv dec, 2 sl st; into R7 FLO: (4 sc, inv dec) x 4 | 46 |
| R10 | 46 sc | 46 |
| R11 | Into R7 BLO: 48 sc | 48 |
| R12 | 48 sc | 48 |
| R13 | (10 sc, inv dec) x 4 | 44 |
| R14-R15 | 44 sc | 44 |
| R16 | (9 sc, inv dec) x 4 | 40 |
| R17 | 40 sc | 40 |
| R18 | 9 sc, inv dec, 18 sc, ch 1, sk 2, 9 sc | 37 |
| R19 | 9 sc, inv dec, 14 sc, ch 5, sk 6, 6 sc | 30 |
| R20 | 8 sc, inv dec, 11 sc, ch 7, sk 6, 3 sc | 23 |
| R21 | 8 sc, inv dec, 7 sc, ch 7, sk 6 | 16 |
| R22 | 3 sl st, 4 sc, inv dec, 4 sc, ch 5, sk 3; sl st to first sc to finish | – |
IMPORTANT
Chains used only to bridge an opening are not included in the printed stitch total. Leave about 50 cm / 20 in of yarn for sewing the body to the head.
Face, Pacifier & Sprout
Face panel
| Rnd / Row | Stitch sequence | Sts |
| R1 | ch 7; from 2nd ch: 5 sc, 3 sc in next ch, 4 sc, inc | 14 |
| R2 | inc, 4 sc, 3 inc, 4 sc, 2 inc | 20 |
| R3 | (inc, 6 sc, inc, 2 sc) x 2 | 24 |
| R4 | 2 inc, 6 sc, 6 inc, 6 sc, 4 inc | 36 |
| R5 | 6 sc, 2 inc, 9 sc, [sc, hdc], hdc inc, 13 sc, hdc inc, [hdc, sc], 2 sc | 42 |
NOTE
Leave about 50 cm / 20 in for sewing the panel to the head.
Blush circles × 2
| Rnd / Row | Stitch sequence | Sts |
| R1 | MR, 6 sc | 6 |
NOTE
Fasten off and weave in the tails.
Pacifier panel
| Rnd / Row | Stitch sequence | Sts |
| H1 | MR; sc, 8 hdc, sc | 10 |
NOTE
Shape gently before sewing.
Sprout leaves
| Rnd / Row | Stitch sequence | Sts |
| Large × 2 | ch 11; from 4th ch: 3 hdc, std dec, 3 sc | – |
| Small × 2 | ch 6; from 2nd ch: 2 sc, std dec, sl st | – |
NOTE
On one piece of each size, leave about 30 cm / 12 in for sewing. Work into the back bumps of the chains.
PLACEMENT TIP
Pin the face panel first, then position the eyes, blush and pacifier while looking at the finished character photo. This is easier than trying to correct spacing after sewing.
Visual checkpoint: the face panel should read as centered from the front, while the four sprout pieces fan outward rather than stacking directly behind one another.
Hands, Feet & Assembly
Left hand
| Rnd / Row | Stitch sequence | Sts |
| H1 | ch 4; work back: {sl st, [ch 1, sl st]} x 4 | – |
| R2 | 4 sc | 4 |
| R3 | 4 inc | 8 |
| R4 | (sc, inc) x 4 | 12 |
| R5 | (inv dec, 4 sc) x 2 | 10 |
| R6 | 10 sc | 10 |
| R7 | (inv dec, 3 sc) x 2 | 8 |
| R8 | 8 sc | 8 |
NOTE
From Round 2 onward, work in a spiral. Leave about 20 cm / 8 in for sewing.
Right hand
| Rnd / Row | Stitch sequence | Sts |
| H1-R5 | Work the same as the left hand through Round 5 | – |
| R6 | (inv dec, 3 sc) x 2 | 8 |
NOTE
Leave about 20 cm / 8 in for sewing.
Feet × 2
| Rnd / Row | Stitch sequence | Sts |
| Sole R1 | MR, 5 sc | 5 |
| Sole R2 | (sc, inc) x 2, sc | 7 |
| Sole R3 | sc, ch 2, sk 2, 4 sc | – |
| Sole R4 | (sc, inc) x 3, sc; use BLO through the chain section | – |
| Left toes H1 | Flatten; sl st, ch 3, sl st, [sl st, ch 2, sl st] x 2, [sl st, ch 1, sl st] | – |
| Right toes H1 | Flatten; [sl st, ch 1, sl st], [sl st, ch 2, sl st] x 2, sl st, ch 3, sl st | – |
| Ankle R1 | Join yarn into the 2 stitches skipped in Sole R3; ch 1, (sc, inv dec) x 2 | – |
| Ankle R2 | 4 sc | 4 |
NOTE
The toe directions create a mirrored left/right pair. Leave about 20 cm / 8 in for sewing.
Assembly – in this order
| 1 | Sew the body to the underside of the finished head. |
| 2 | Center and pin the face panel. Add the eyes and facial embroidery before closing the last section of the panel seam. |
| 3 | Sew on the two blush circles and pacifier. |
| 4 | Arrange the four sprout leaves at the top of the head and sew securely. |
| 5 | Add the belly-button embroidery, hands and mirrored feet. Check the sitting pose before tightening the final stitches. |
Sunny Chick
Cheerful bird-inspired garlic sprout
Leaves & Face
Garlic sprout leaves × 5
| Rnd / Row | Stitch sequence | Sts |
| Leaf 1 | Attach to FLO of the second-to-last head round. ch 20; work back from 1st ch: 5 sl st, 15 sc; sk 2 base sts, sl st | – |
| Leaf 2 | ch 23; work back from 1st ch: 7 sl st, 16 sc; sk 2 base sts, sl st | – |
| Leaf 3 | ch 22; work back from 1st ch: 6 sl st, 16 sc; sk 2 base sts, sl st | – |
| Leaf 4 | ch 20; work back from 1st ch: 5 sl st, 15 sc; sk 2 base sts, sl st | – |
| Leaf 5 | ch 23; work back from 1st ch: 7 sl st, 16 sc; sk 2 base sts, sl st | – |
NOTE
Work into back bumps. Crochet the sc section over thin flexible craft wire so each leaf can be shaped.
Face panel
| Rnd / Row | Stitch sequence | Sts |
| R1 | ch 7; from 2nd ch: 5 sc, 3 sc in next ch, 4 sc, inc | 14 |
| R2 | inc, 4 sc, 3 inc, 4 sc, 2 inc | 20 |
| R3 | (inc, 6 sc, inc, 2 sc) x 2 | 24 |
| R4 | 2 inc, 6 sc, 6 inc, 6 sc, 4 inc | 36 |
| R5 | (14 sc, inc, sc, inc, sc) x 2 | 40 |
NOTE
Leave about 50 cm / 20 in for sewing.
Blush circles × 2
| Rnd / Row | Stitch sequence | Sts |
| R1 | MR, 6 sc | 6 |
Beak
| Rnd / Row | Stitch sequence | Sts |
| H1 | MR; (ch 1, hdc, ch 1, sl st) x 2 | – |
Top feather
| Rnd / Row | Stitch sequence | Sts |
| H1 | ch 5; from 2nd ch: sc, hdc, inc, sl st | – |
NOTE
Leave about 15 cm / 6 in for sewing.
Wings, Feet & Tail
Left wing
| Rnd / Row | Stitch sequence | Sts |
| R1 | MR, 4 sc | 4 |
| R2 | 4 inc | 8 |
| R3 | (sc, inc) x 4 | 12 |
| R4-R6 | 12 sc | 12 |
| R7 | 2 sc, inv dec, 8 sc | 11 |
| R8 | 11 sc | 11 |
| R9 | sc, inv dec, 5 sc, inv dec, sc | 9 |
| R10 | 2 inv dec, 5 sc | 7 |
| H11 | ch 1; flatten and work 2 sc through both layers | 2 |
NOTE
Leave about 20 cm / 8 in for sewing.
Right wing
| Rnd / Row | Stitch sequence | Sts |
| R1 | MR, 4 sc | 4 |
| R2 | 4 inc | 8 |
| R3 | (sc, inc) x 4 | 12 |
| R4 | 12 sc | 12 |
| R5 | 2 sc, inv dec, 4 sc, inv dec, 2 sc | 10 |
| R6 | 10 sc | 10 |
| R7 | 7 sc, inv dec, sc | 9 |
| H8 | ch 1; flatten and work 3 sc through both layers | 3 |
NOTE
Leave about 20 cm / 8 in for sewing.
Feet × 2
| Rnd / Row | Stitch sequence | Sts |
| Sole R1 | MR, 5 sc | 5 |
| Sole R2 | (sc, inc) x 2, sc | 7 |
| Sole R3 | 4 sc, ch 2, sk 2, sc | – |
| Sole R4 | (sc, inc) x 3, sc; when crossing the chain section, work into the back loop | – |
| Toe H5 | ch 1; flatten. [2 sc], sl st, [2 sc, sl st], [2 sc], sl st | – |
| Ankle R1 | Join yarn into the 2 stitches skipped in Sole R3; ch 1, (sc, inv dec) x 2 | – |
| Ankle R2 | 4 sc | 4 |
NOTE
The ankle begins in the two stitches skipped when the sole opening was created.
Tail
| Rnd / Row | Stitch sequence | Sts |
| R1 | MR, 4 sc | 4 |
| R2 | 4 inc | 8 |
| R3 | (sc, inc) x 4 | 12 |
| R4 | 2 sc, inv dec, 4 sc, inv dec, 2 sc | 10 |
NOTE
Leave about 15 cm / 6 in for sewing.
BEFORE SEWING
Pin both wings, both feet and the tail first. Check the sitting pose from the front and side, then sew once the balance looks right.
Put Sunny Chick Together
PLACEMENT CHECK
□ Face panel centered on the bulb
□ Beak and blush aligned before final sewing
□ Five leaves fanned rather than stacked
□ Wings mirrored left/right
□ Feet level so the doll sits without tipping
Assembly – in this order
| 1 | Sew the Standard Body to the Shared Head and check that the doll sits flat. |
| 2 | Attach the face panel. Add eyes, blush circles, beak and the small top feather. |
| 3 | Sew the five wired sprout leaves into the top of the head and curve them gently. |
| 4 | Attach the left and right wings in their correct orientation. |
| 5 | Sew on both feet and the tail. Pin first so the character remains balanced when seated. |
FINAL CHECK
Look at the doll from the front, side and back before weaving in the last tails. Small angle corrections are much easier before the seams are locked.
If something looks off
| DOLL TIPS FORWARD • Move the feet a little farther forward before sewing • Check that the body is centered under the head | FACE LOOKS TILTED • Re-pin the face panel before tightening the seam • Compare eye height from the front, not from above |
LEAVES FEEL CROWDED
Fan the five sprout leaves around the crown and curve them only after all five attachment points are secure.
Cozy Lamb
Soft lamb-inspired garlic sprout
Leaves & Face
Garlic sprout leaves × 5
| Rnd / Row | Stitch sequence | Sts |
| Leaf 1 | Attach to FLO of the second-to-last head round. ch 20; work back from 1st ch: 5 sl st, 15 sc; sk 2 base sts, sl st | – |
| Leaf 2 | ch 23; work back from 1st ch: 7 sl st, 16 sc; sk 2 base sts, sl st | – |
| Leaf 3 | ch 22; work back from 1st ch: 6 sl st, 16 sc; sk 2 base sts, sl st | – |
| Leaf 4 | ch 20; work back from 1st ch: 5 sl st, 15 sc; sk 2 base sts, sl st | – |
| Leaf 5 | ch 23; work back from 1st ch: 7 sl st, 16 sc; sk 2 base sts, sl st | – |
NOTE
Work into back bumps. Crochet the sc section over thin flexible craft wire.
Face panel
| Rnd / Row | Stitch sequence | Sts |
| R1 | ch 7; from 2nd ch: 5 sc, 3 sc in next ch, 4 sc, inc | 14 |
| R2 | inc, 4 sc, 3 inc, 4 sc, 2 inc | 20 |
| R3 | (inc, 6 sc, inc, 2 sc) x 2 | 24 |
| R4 | 2 inc, 6 sc, 6 inc, 6 sc, 4 inc | 36 |
| R5 | (14 sc, inc, sc, inc, sc) x 2 | 40 |
NOTE
Leave about 50 cm / 20 in for sewing.
Blush pieces × 2
| Rnd / Row | Stitch sequence | Sts |
| H1 | ch 4; from 2nd ch: sc, hdc, [sc, sl st] | – |
NOTE
Work into the back bumps of the chain.
Ears × 2
| Rnd / Row | Stitch sequence | Sts |
| R1 | MR, 6 sc | 6 |
| R2 | 6 inc | 12 |
NOTE
Leave about 15 cm / 6 in for sewing.
Horns × 2
| Rnd / Row | Stitch sequence | Sts |
| H1 | ch 4; from 2nd ch: sl st, [sc, hdc], hdc | – |
NOTE
Work into the back bumps. Leave about 15 cm / 6 in for sewing.
Front Legs, Feet, Tail & Assembly
Left front leg
| Rnd / Row | Stitch sequence | Sts |
| R1 | ch 5; from 2nd ch: 3 sc, 3 sc in next, 2 sc, inc | 10 |
| R2 | inc, 9 sc | 11 |
| R3 | 10 sc, inc | 12 |
| R4 | 5 sc, inv dec, 5 sc | 11 |
| R5 | 5 sc, inv dec, 4 sc | 10 |
| R6 | 4 sc, inv dec, 4 sc | 9 |
| R7-R9 | 9 sc | 9 |
NOTE
Leave about 15 cm / 6 in for sewing.
Right front leg
| Rnd / Row | Stitch sequence | Sts |
| R1 | ch 5; from 2nd ch: 3 sc, 3 sc in next, 2 sc, inc | 10 |
| R2 | 10 sc | 10 |
| R3 | inv dec, 8 sc | 9 |
| R4 | 7 sc, inv dec | 8 |
NOTE
Leave about 15 cm / 6 in for sewing.
Feet × 2
| Rnd / Row | Stitch sequence | Sts |
| Sole R1 | MR, 8 sc | 8 |
| Sole R2 | 3 sc, inc, sc, ch 2, sk 2, inc | – |
| Sole R3 | 10 sc; use BLO through the chain section | 10 |
| Toe H4 | Flatten; sl st, {ch 1, hdc, [ch 1, sl st], ch 1, sl st} x 2 | – |
| Ankle R1 | Join yarn into the 2 stitches skipped in Sole R2; ch 1, (sc, inv dec) x 2 | – |
| Ankle R2 | 4 sc | 4 |
NOTE
Leave about 20 cm / 8 in for sewing.
Tail
| Rnd / Row | Stitch sequence | Sts |
| R1 | MR, 6 sc | 6 |
| R2 | (sc, inc) x 3 | 9 |
| R3 | 9 sc | 9 |
| R4 | (sc, inv dec) x 3 | 6 |
NOTE
Leave about 15 cm / 6 in for sewing.
Assembly – in this order
| 1 | Sew the Standard Body securely to the Shared Head. |
| 2 | Attach the face panel and position the eyes before the panel seam is fully closed. |
| 3 | Add the blush pieces, ears and small horns, then embroider the simple mouth/nose detail. |
| 4 | Sew the wired sprout leaves into the top of the bulb. |
| 5 | Attach the left and right front legs, both feet and the tail. Pin everything first to preserve the sitting pose. |
Little Penguin
Classic black-and-white garlic sprout
Leaves & Two-color Face
Garlic sprout leaves × 5
| Rnd / Row | Stitch sequence | Sts |
| Leaf 1 | Attach to FLO of the second-to-last head round. ch 20; work back from 1st ch: 5 sl st, 15 sc; sk 2 base sts, sl st | – |
| Leaf 2 | ch 23; work back from 1st ch: 7 sl st, 16 sc; sk 2 base sts, sl st | – |
| Leaf 3 | ch 22; work back from 1st ch: 6 sl st, 16 sc; sk 2 base sts, sl st | – |
| Leaf 4 | ch 20; work back from 1st ch: 5 sl st, 15 sc; sk 2 base sts, sl st | – |
| Leaf 5 | ch 23; work back from 1st ch: 7 sl st, 16 sc; sk 2 base sts, sl st | – |
NOTE
Work into back bumps. Crochet the sc section over thin flexible craft wire.
TWO-COLOR FACE
In the table below, “Color B” marks the contrast-color stitches that form the dark cap. Keep both yarns attached as needed and carry the inactive yarn neatly along the back.
Two-color face panel
| Rnd / Row | Stitch sequence | Sts |
| R1 | ch 7; from 2nd ch: 5 sc, 3 sc in next ch, sc, 2 sc [Color B], sc, inc | 14 |
| R2 | inc, 4 sc, 3 inc, sc, 2 sc [Color B], sc, 2 inc | 20 |
| R3 | inc, 6 sc, inc, 2 sc, inc, sc, 4 sc [Color B], sc, inc, 2 sc | 24 |
| R4 | 2 inc, 6 sc, 5 inc, inc [Color B], 6 sc [Color B], inc [Color B], 3 inc | 36 |
| R5 | 14 sc, inc, sc, inc, sc, 14 sc [Color B], [sc, sc], sc, inc, sc | 40 |
NOTE
Leave about 50 cm / 20 in tails in both colors for finishing and sewing.
Blush pieces × 2
| Rnd / Row | Stitch sequence | Sts |
| H1 | ch 3; from 2nd ch: 2 sl st | – |
Beak
| Rnd / Row | Stitch sequence | Sts |
| H1 | ch 4; from 2nd ch: sl st, sc, sl st | – |
Wings, Feet & Tail
Left wing
| Rnd / Row | Stitch sequence | Sts |
| R1 | MR, 4 sc | 4 |
| R2 | 4 inc | 8 |
| R3 | (sc, inc) x 4 | 12 |
| R4-R6 | 12 sc | 12 |
| R7 | 2 sc, inv dec, 8 sc | 11 |
| R8 | 11 sc | 11 |
| R9 | sc, inv dec, 5 sc, inv dec, sc | 9 |
| R10 | 2 inv dec, 5 sc | 7 |
| H11 | ch 1; flatten and work 2 sc through both layers | 2 |
NOTE
Leave about 20 cm / 8 in for sewing.
Right wing
| Rnd / Row | Stitch sequence | Sts |
| R1 | MR, 4 sc | 4 |
| R2 | 4 inc | 8 |
| R3 | (sc, inc) x 4 | 12 |
| R4 | 12 sc | 12 |
| R5 | 2 sc, inv dec, 4 sc, inv dec, 2 sc | 10 |
| R6 | 10 sc | 10 |
| R7 | 7 sc, inv dec, sc | 9 |
| H8 | ch 1; flatten and work 3 sc through both layers | 3 |
NOTE
Leave about 20 cm / 8 in for sewing.
Feet × 2
| Rnd / Row | Stitch sequence | Sts |
| Sole R1 | MR, 5 sc | 5 |
| Sole R2 | (sc, inc) x 2, sc | 7 |
| Sole R3 | 4 sc, ch 2, sk 2, sc | – |
| Sole R4 | (sc, inc) x 3, sc; when crossing the chain section, work into the back loop | – |
| Toe H5 | ch 1; flatten. [2 sc], sl st, [2 sc, sl st], [2 sc], sl st | – |
| Ankle R1 | Join yarn into the 2 stitches skipped in Sole R3; ch 1, (sc, inv dec) x 2 | – |
| Ankle R2 | 4 sc | 4 |
NOTE
Leave about 20 cm / 8 in for sewing.
Tail
| Rnd / Row | Stitch sequence | Sts |
| R1 | MR, 4 sc | 4 |
| R2 | 4 inc | 8 |
| R3 | (sc, inc) x 4 | 12 |
| R4 | 2 sc, inv dec, 4 sc, inv dec, 2 sc | 10 |
NOTE
Leave about 15 cm / 6 in for sewing.
PAUSE HERE
Pin the wings, feet and tail before sewing. Check the seated balance from the front and side.
Belly, Scarf & Final Assembly
Belly patch
| Rnd / Row | Stitch sequence | Sts |
| R1 | MR, 6 sc | 6 |
| R2 | 6 inc | 12 |
| R3 | (sc, inc) x 6 | 18 |
| R4 | (sc, inc, sc) x 6 | 24 |
NOTE
Leave about 40 cm / 16 in for sewing.
Scarf / neck band
| Rnd / Row | Stitch sequence | Sts |
| H1 | ch 2; from 2nd ch: sc | 1 |
| H2 | ch 1, turn, sc | 1 |
NOTE
Repeat Row 2 until the strip measures about 17 cm / 6.7 in. Leave about 15 cm / 6 in for sewing.
Assembly – in this order
| 1 | Sew the Standard Body to the Shared Head and confirm the seated balance. |
| 2 | Attach the two-color face panel. Add eyes, blush and beak; secure carried yarn neatly on the back. |
| 3 | Sew the five wired sprout leaves into the top of the head. |
| 4 | Attach the left and right wings, both feet and the tail. |
| 5 | Sew the belly patch to the center front of the body. |
| 6 | Wrap the scarf around the neck, overlap the ends slightly and tack them securely in place. |
Final quality check
All yarn tails are securely woven or hidden inside stuffed pieces.
Wire ends are bent inward and fully enclosed.
Eyes and small facial pieces are firmly attached.
Each doll sits evenly without twisting to one side.
Sprout leaves curve naturally without pulling the head out of shape.
Care
Spot clean gently with cool water and mild soap. Do not machine wash pieces containing craft wire. Reshape while damp and allow to air dry completely.
CROCHET FAVORITES NOTE
Small changes in yarn weight, hook size and tension will change the finished dimensions. The reference dolls are approximately 12 cm / 4.7 in tall.
Garlic Crochet Pattern FAQ
Is this garlic amigurumi pattern beginner-friendly?
It is best for intermediate crocheters or confident beginners who are already comfortable with magic rings, increases, decreases, working in rounds and sewing small amigurumi pieces.
How big are the finished dolls?
Using the recommended 2.0 mm hook and sport-weight cotton, the reference dolls are approximately 12 cm / 4.7 in tall. Yarn weight, hook size and tension will change the final dimensions.
Do I need wire for the leaves?
No. Thin flexible craft wire gives the sprout leaves more shape, but it can be omitted – especially for toys intended for small children.
Can I use a different yarn?
Yes. Keep the hook appropriate for your yarn and maintain a tight amigurumi fabric so the stuffing does not show through. Expect the finished size to change.
Which character should I make first?
Sunny Chick and Cozy Lamb are good choices if you want to use the standard shared body. Lavender Bud adds a custom body, while Little Penguin introduces a two-color face panel and extra finishing pieces.
A Whole Little Garlic-Sprout Crew
The fun part of this pattern is that the four characters look like a coordinated collection without feeling identical. Once you have made the shared garlic head once, the construction becomes much easier to understand – and the different faces, limbs and accessories do most of the character work.
If you make one of the Garlic Sprout Friends, save the pattern and experiment with your own color combinations. The same base can look surprisingly different with a new palette, expression or set of finishing details.
PRINTABLE VERSION
For readers who prefer a compact, printer-friendly layout, use the Crochet Favorites 4-in-1 printable PDF edition.

