Free Dragon Crochet Pattern: Dusk & Pearl Mini Amigurumi Duo

FREE PATTERN • CROCHET FAVORITES
Want a small dragon crochet pattern that gives you two finished looks without making you learn two completely different constructions? Dusk & Pearl uses one shared amigurumi base to create a dark dragon with green eye accents and a soft white dragon with light-blue details.
This browser-friendly version walks through the complete pattern in a practical make order: prepare the eyes, crochet the shared head and body pieces, add the dragon details, assemble the toy, then finish the face. The finished sample is approximately 10 cm / 3.9 in tall, so the project is compact enough for a weekend make while still giving you plenty of character-shaping detail.
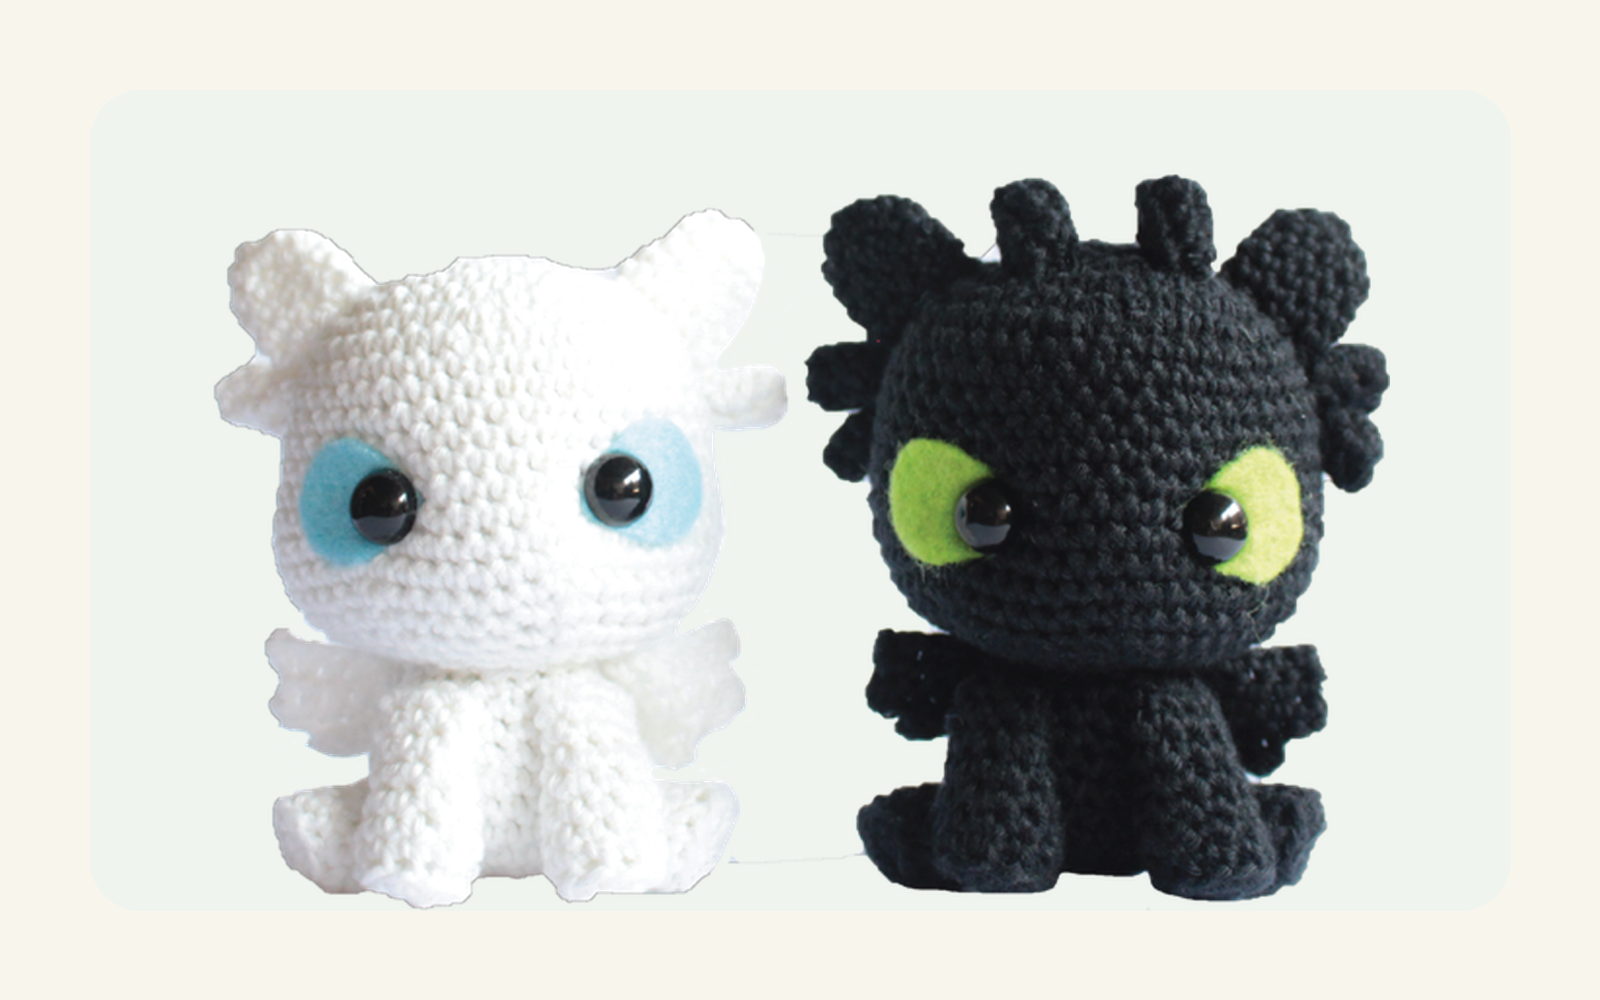
Dusk and Pearl: two colorways built from one shared mini dragon construction.
PRINTABLE PDF
Prefer a clean, distraction-free version while you crochet? The printable Dusk & Pearl Dragon Duo PDF is available from Crochet Favorites. Add your Etsy product link here before publishing.
Why You’ll Like This 2-in-1 Dragon Pattern
One shared construction creates two clearly different dragon colorways.
The project stays small: the sample measures about 10 cm / 3.9 in tall.
Round-by-round stitch counts make it easier to catch mistakes early.
The pattern includes assembly order, optional eye sculpting and final shape checks.
Project at a Glance
| Skill level | Easy to medium |
| Finished size | Approx. 10 cm / 3.9 in tall with the sample materials |
| Sample hook | 2.50 mm |
| Sample safety eyes | 10 mm |
| Construction | Amigurumi rounds + a few small pieces worked in rows |
| Terminology | English • US crochet terms |
Meet Dusk & Pearl
The two dragons share almost the entire construction, but a few details change the final silhouette:
| Dusk Dragon | Black main yarn • light-green felt eyes • 4 large + 2 small head spikes • black/red tail accent |
| Pearl Dragon | White main yarn • light-blue felt eyes • 2 large head spikes only • all-white body details |
Materials and Tools
Yarn for your chosen version: black or white as the main color, plus red for the Dusk Dragon tail accent
Light-green felt for Dusk Dragon eyes or light-blue felt for Pearl Dragon eyes
Crochet hook matched to your yarn (2.50 mm used for the sample)
1 pair of safety eyes with washers (10 mm used for the sample)
Polyester fiberfill
Tapestry or yarn needle
Stitch marker
Scissors
Fabric glue or hot glue for felt details (optional)
CHILD-SAFETY OPTION
For a toy intended for a small child, embroider the eyes instead of using safety eyes and avoid hot-glued details.
Crochet Abbreviations
| MR | magic ring | dec | single-crochet decrease |
| R | round | BLO | back loop only |
| ch | chain | sl st | slip stitch |
| st(s) | stitch(es) | xN | repeat N times |
| sc | single crochet | [N] | stitch count at end of round |
| inc | 2 sc in one stitch | ||
Before You Start
Eyes → Head
Body → Back legs → Front legs
Ears → Large head spikes → Small head spikes
Main tail → Tail fins → Wings
Assembly → Optional eye sculpting
BEST HABIT
Check the stitch count at the end of every round before moving on. Small count errors show up quickly in compact amigurumi.
Full Dusk & Pearl Dragon Crochet Pattern
The pattern below follows the same practical make order as the printable PDF. Make the shared base first, then apply the Dusk or Pearl finishing details.
1. Prepare the Felt Eyes
Cut 2 teardrop shapes from felt. Use light green for Dusk or light blue for Pearl. Size the felt to suit your safety eyes, then cut a small hole near the pointed end so the eye post can pass through.
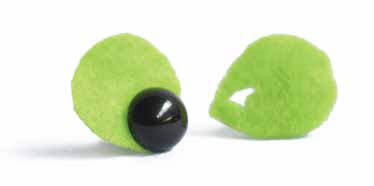
Felt eye backing: size the teardrop shape to the eyes you are using.
2. Head
Work in your main yarn color. The Dusk sample is black; the Pearl sample is white.
| Round | Stitch sequence | Sts |
| R1 | 6 sc in MR | 6 |
| R2 | inc x 6 | 12 |
| R3 | (inc, sc) x 6 | 18 |
| R4 | (inc, 2 sc) x 6 | 24 |
| R5 | (inc, 3 sc) x 6 | 30 |
| R6 | (inc, 4 sc) x 6 | 36 |
| R7 | (inc, 5 sc) x 6 | 42 |
| R8-R13 | sc around | 42 |
| R14 | (inc, 6 sc) x 6 | 48 |
| R15-R17 | sc around | 48 |
| R18 | (dec, 6 sc) x 6 | 42 |
| R19 | (dec, 5 sc) x 6 | 36 |
| R20 | (dec, 4 sc) x 6 | 30 |
| R21 | (dec, 3 sc) x 6 | 24 |
| R22 | (dec, 2 sc) x 6 | 18 |
EYE PLACEMENT
Place the eyes between R14 and R15 with about 8 stitches between the posts. Secure the washers, begin stuffing, and continue stuffing as you close the head. Fasten off after R22. Sew the felt backing with thin yarn or attach it carefully with fabric glue.
3. Body
| Round | Stitch sequence | Sts |
| R1 | 6 sc in MR | 6 |
| R2 | inc x 6 | 12 |
| R3 | (inc, sc) x 6 | 18 |
| R4 | (inc, 2 sc) x 6 | 24 |
| R5 | (inc, 3 sc) x 6 | 30 |
| R6-R8 | sc around | 30 |
| R9 | (dec, 3 sc) x 6 | 24 |
| R10-R11 | sc around | 24 |
| R12 | (dec, 2 sc) x 6 | 18 |
Fasten off, leave a long sewing tail and stuff firmly.
4. Back Legs – Make 2
| Round | Stitch sequence | Sts |
| R1 | 5 sc in MR | 5 |
| R2 | inc x 5 | 10 |
| R3 | BLO, sc around | 10 |
| R4-R6 | sc around | 10 |
Fasten off, leave a long sewing tail and stuff fully.
SHAPE CHECK
Before sewing, pin the body under the head and place both back legs symmetrically. The dragon should sit without leaning.
5. Front Legs – Make 2
| Round | Stitch sequence | Sts |
| R1 | 5 sc in MR | 5 |
| R2 | inc x 5 | 10 |
| R3 | BLO, sc around | 10 |
| R4-R6 | sc around | 10 |
| R7 | (dec, 3 sc) x 2 | 8 |
| R8-R9 | sc around | 8 |
Stuff lightly, then leave a tail for sewing.
6. Ears – Make 2
| Round | Stitch sequence | Sts |
| R1 | 5 sc in MR | 5 |
| R2 | inc x 5 | 10 |
| R3-R6 | sc around | 10 |
Do not stuff. Flatten gently and leave a tail for sewing.
ORIENTATION
The front legs taper toward the body. Pin them in place before sewing so both sides mirror each other.
7. Head Spikes
Dusk uses two spike sizes. Keep the pieces unstuffed so they sit flatter against the head.
Large Head Spikes – Make 4 for Dusk
| Round | Stitch sequence | Sts |
| R1 | 5 sc in MR | 5 |
| R2-R4 | sc around | 5 |
Fasten off and leave a tail for sewing. Do not stuff. Working these pieces inside out can make the tiny tube easier to handle.
Small Head Spikes – Make 2 for Dusk
| Round | Stitch sequence | Sts |
| R1 | 4 sc in MR | 4 |
| R2-R3 | sc around | 4 |
Fasten off and leave a tail for sewing. Do not stuff.
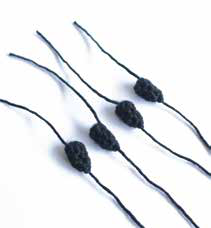
Large head spikes are left unstuffed so they lie neatly against the head.
PEARL CHANGE
For Pearl, omit the small spikes and make only 2 large spikes. Sew them beneath the ears.
8. Main Tail
| Round | Stitch sequence | Sts |
| R1 | 4 sc in MR | 4 |
| R2 | (sc, inc) x 2 | 6 |
| R3 | (2 sc, inc) x 2 | 8 |
| R4 | (3 sc, inc) x 2 | 10 |
| R5-R6 | sc around | 10 |
| R7 | (4 sc, inc) x 2 | 12 |
| R8 | (5 sc, inc) x 2 | 14 |
Stuff fully and leave a long tail for sewing.
9. Tail Fins – Make 2
Leave a sewing tail before you begin.
R1: ch 6; starting in 2nd ch from hook, 4 sc, inc; ch 1, turn [6]
R2: inc, 3 sc; leave final stitch unworked; ch 1, turn [5]
R3: skip 1 stitch, 3 sc, inc [6]
Fasten off and weave in the working tail. Sew both fins to the main tail.

Tail fins are sewn to the main tail before final assembly.
COLOR NOTE
The Dusk sample uses one black and one red tail fin. For Pearl, work the pieces in white unless you intentionally choose a contrasting accent.
10. Wings – Make 2
R1: ch 11; starting in 2nd ch from hook, 5 sc, sl st; ch 1, turn [6]
R2: 5 sc; leave final stitch unworked; ch 1, turn [5]
R3: 5 sc, sl st down into the starting-chain section from R1; ch 1, turn [6]
R4: 5 sc; leave final stitch unworked; ch 1, turn [5]
R5: 5 sc, 3 sl st down into the starting-chain section [8]
Fasten off and leave a tail for sewing.

Make two matching wings and leave a sewing tail on each.
11. Pearl Dragon Variation
Use the same base pattern, then make these four changes:
Main color: work all crocheted pieces in white.
Eye felt: use light-blue felt.
Head spikes: do not make the small spikes.
Large spikes: make only 2 and sew them beneath the ears.

Pearl uses the shared base with white yarn, blue eye felt and simplified head spikes.
REFERENCE PHOTO
Because both versions share almost all construction steps, keep a finished photo nearby to check spike placement, wing angle and the final silhouette.
12. Assembly
Pin every piece before sewing. On a 10 cm amigurumi, a small change in angle makes a noticeable difference.
Sew the body to the head.
Sew the back legs to the sides of the body.
Sew the front legs to the front of the body.
Sew the tail to the back of the body.
Sew the ears to the top of the head.
Dusk: sew 2 large head spikes beneath the ears.
Dusk: sew 1 small spike beneath each side large spike.
Dusk: sew the remaining 2 large spikes along the top of the head.
Sew the wings to the back of the body.
PEARL ASSEMBLY
For Pearl, skip Dusk steps 7-8. Use only the 2 large spikes beneath the ears.
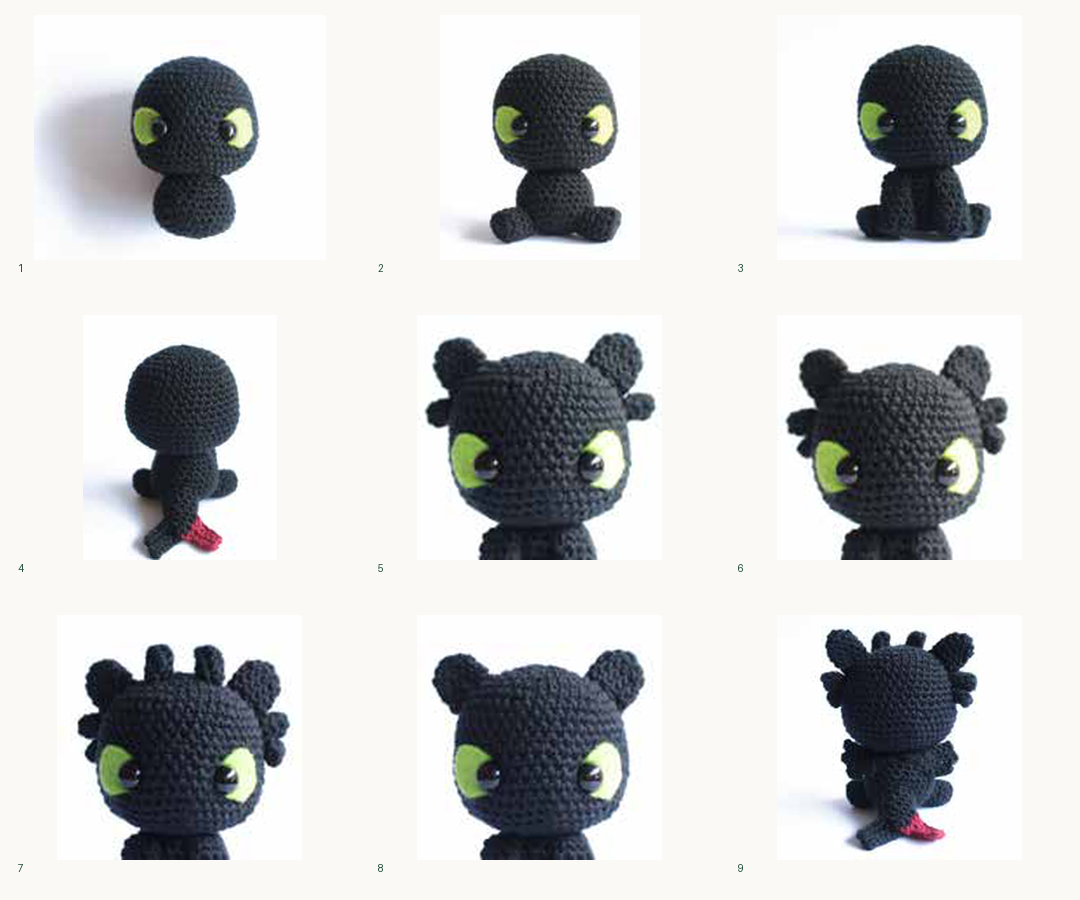
Assembly sequence: pin first, then sew the body, legs, tail, ears, spikes and wings in order.
13. Optional Eye Sculpting
This subtle finishing technique pulls the inner edges of the eyes slightly toward each other and gives the face more expression. It is optional.
1. Anchor a matching yarn strand near the inner edge of one eye.
2. Take the needle through the head and bring it out near the inner edge of the opposite eye.
3. Pull gently until the face has the amount of indentation you like.
4. Secure the tension with a knot and weave the yarn tails inside.
DO NOT OVERTIGHTEN
Pull only enough to shape the face. Too much tension can distort the head or pull the felt out of position.
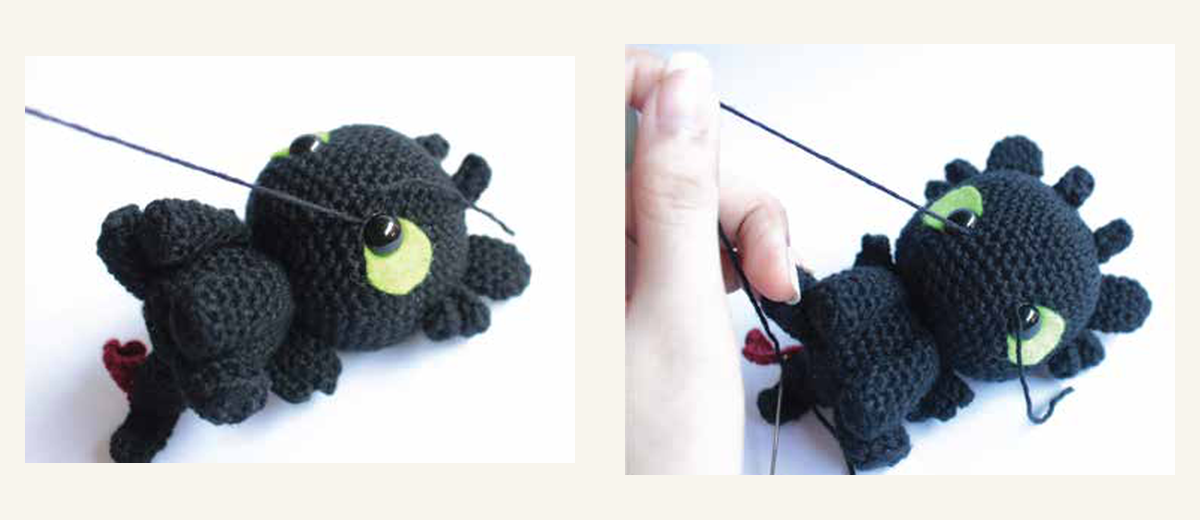
Optional eye sculpting can add a little more expression to the finished dragon.
Final Shape Check
The head sits centered over the body.
Both front legs point forward at matching angles.
Back legs support a stable seated pose.
Wings mirror each other.
Tail and fins are centered from the rear.
Head spikes are evenly spaced.
Felt eye pieces lie flat with no visible glue.
Quick Troubleshooting
| Eyes look uneven | Re-pin the felt and confirm both eye posts sit at the same round before securing. |
| A leg lifts off the surface | Unpin and rotate the leg slightly before stitching the seam permanently. |
| A head spike twists | Flatten the base and secure it with two small anchor points instead of one. |
Care and Display
Spot-clean gently and allow the piece to air-dry fully. Avoid soaking glued felt details. If the amigurumi is intended for a child, use embroidered eyes and securely sewn details rather than removable or glued components.
Dragon Crochet Pattern FAQ
Is this dragon crochet pattern beginner-friendly?
The source pattern rates the project Easy to Medium. You should be comfortable with a magic ring, single crochet, increases, decreases, back-loop-only stitches, chains, slip stitches, basic rows and sewing small amigurumi pieces.
How big are the finished dragons?
Using the sample materials, each dragon is approximately 10 cm / 3.9 in tall. Your result can change with yarn thickness, hook size, stuffing and tension.
Do Dusk and Pearl use different patterns?
They share the same main construction. Pearl changes the main color and eye felt, omits the small head spikes and uses only two large spikes beneath the ears.
Do I have to use safety eyes?
No. The pattern uses 10 mm safety eyes in the sample, but for a toy intended for a small child the safer option described in the pattern is embroidered eyes and securely sewn details.
What crochet terms does the pattern use?
The instructions are written in English using US crochet terminology.
Prefer the Printable PDF?
If you want the same pattern in a clean, printable layout with round tables, reference images, assembly guidance and finishing checks, use the Dusk & Pearl Dragon Duo PDF from Crochet Favorites.
PUBLISHING NOTE
Replace this line with the final Etsy product link before the article goes live.
Save It for Later
Pin this dragon crochet pattern so you can come back when you are ready to make Dusk, Pearl – or the matching pair.
Crochet Favorites • Crochet patterns designed to be clear, useful and enjoyable to make.